Azure Project ETL Workshop: File Structure Validation, Slow Changing Dimension and Data Loading
A data analytics engineer with four years of experience working as a data engineer. Holds a MSc in Data.
Challenges:
Building Dynamic Data Pipeline: Processing multiple files with different column names; Need a dynamic pipeline that can handle varying file structures.
Maintaining file structure integrity: Need to validate file structures against a database table before processing.
Key components:
Source system: A data storage containing multiple files.
Destination: An SQL database with multiple tables.
Azure Data Factory: Used to move data from source to destination.
Azure Mapping Dataflow: Used for complex data transformations.
Solution approach:
File structure validation: Create a database table to store file structures and validate incoming files against it. Process only files with matching structures.
Dynamic pipeline: Design a single pipeline that can accept different files and perform transformations regardless of column names.
Data transformation: Use Azure Mapping Dataflow to apply necessary transformations to the data.
Storing data in different tables: Configure the system to save transformed data into appropriate SQL tables based on requirements.
House Keeping Before Creating a the Dataflow:
Creating SQL Tables: We start with creating the following two tables before moveing on to the next stage.
 SET ANSI_NULLS ON
 GO

 SET QUOTED_IDENTIFIER ON
 GO

 CREATE TABLE [dbo].[tbl_IPLPlayers](
     [SKey] [int] NOT NULL,
     [Player_Id] [nvarchar](9) NOT NULL,
     [Player_Name] [nvarchar](60) NOT NULL,
     [Batting_Hand] [nvarchar](30) NULL,
     [Bowling_Skill] [nvarchar](30) NULL,
     [Country] [nvarchar](50) NULL,
     [Team] [nvarchar](50) NULL,
     [Coach] [nvarchar](60) NULL,
     [Active] [int] NULL,
     [ActiveStartTime] [datetime2](7) NULL,
     [ActiveEndTime] [datetime2](7) NULL
 ) ON [PRIMARY]
 GO

 ALTER TABLE [dbo].[tbl_IPLPlayers] ADD  DEFAULT ((1)) FOR [Active]
 GO
SET ANSI_NULLS ON GO SET QUOTED_IDENTIFIER ON GO CREATE TABLE [dbo].[tbl_FIFAData]( [SKey] [int] NULL, [ID] [nvarchar](9) NOT NULL, [Name] [nvarchar](60) NOT NULL, [Age] [nvarchar](7) NULL, [Nationality] [nvarchar](60) NULL, [Club] [nvarchar](60) NULL, [Wage] [nvarchar](10) NULL, [PreferredFoot] [nvarchar](60) NULL, [Position] [nvarchar](60) NULL, [Active] [int] NULL, [ActiveStartTime] [datetime2](7) NULL, [ActiveEndTime] [datetime2](7) NULL ) ON [PRIMARY] GO ALTER TABLE [dbo].[tbl_FIFAData] ADD DEFAULT ((1)) FOR [Active] GOCreating Datasets: We start with creating two datasets in ADF. One for our source in Data Lake Gen 2 and another for our target sink in Azure SQL Server. We create them with two parameters show in the picture. These parameters will help us make the datasets more dynamic.


Creating Dataflow
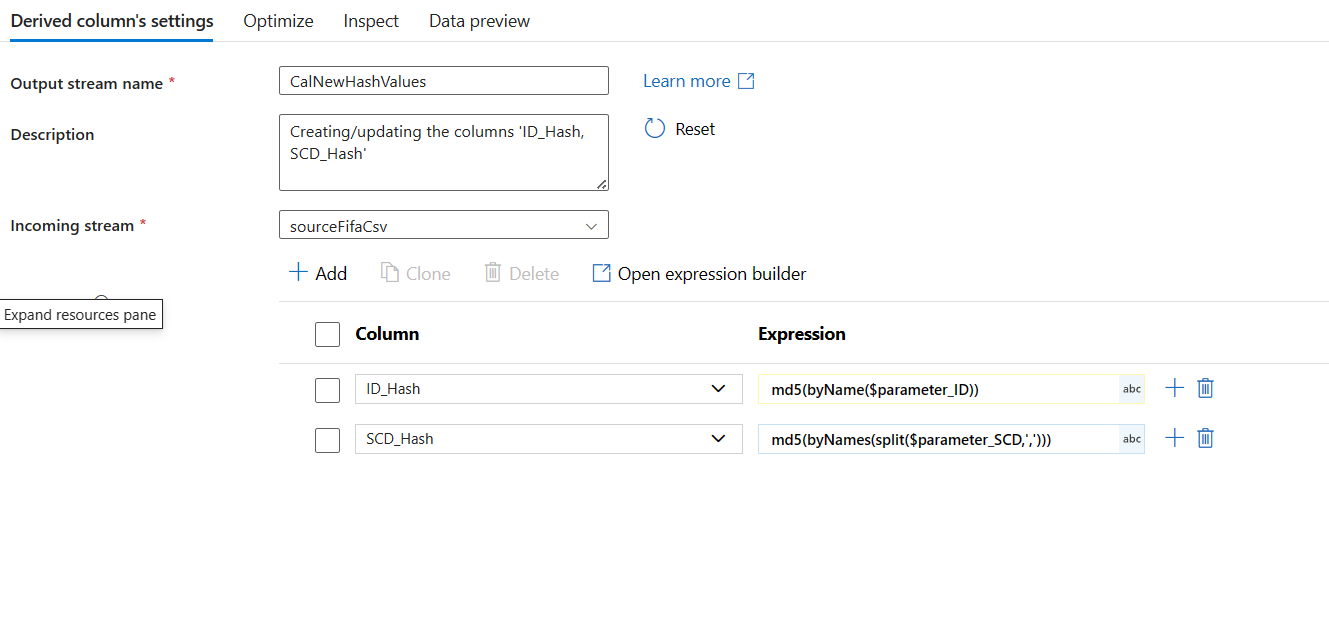
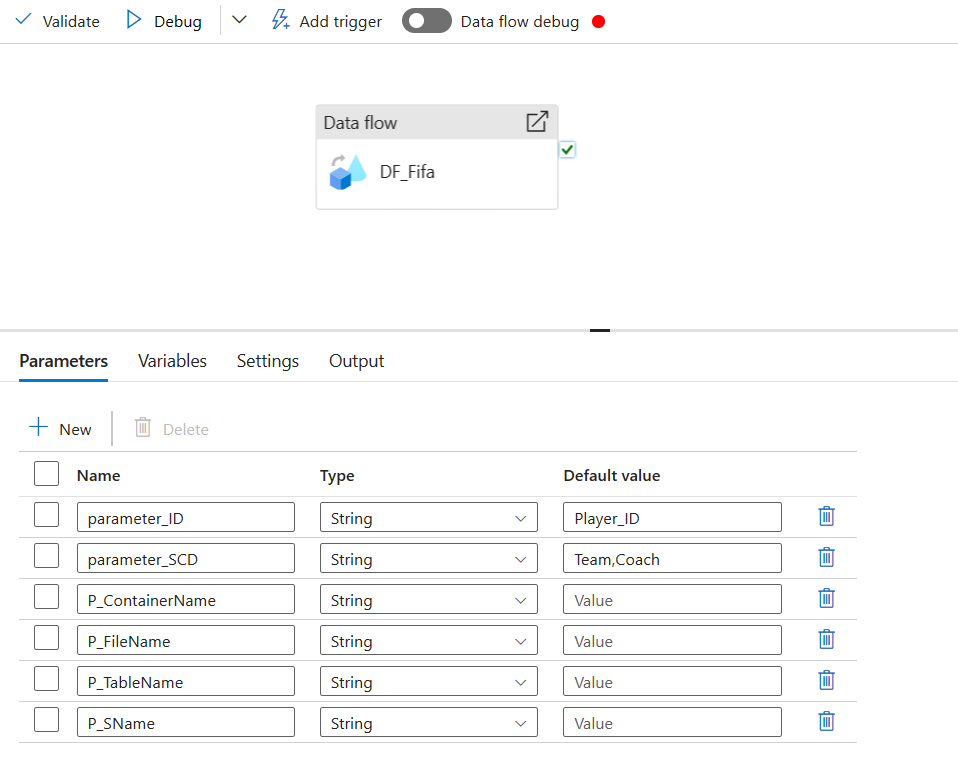
Creating Dataflow and Dataflow Parameters: We start with adding two Two data sources to the dataflow. One is for the New Data (using source dataset) and the other is for the existing sql database (using sql dataset). Following are the parameters created for the data flow. These parameters will be used to create md5 hashing columns.

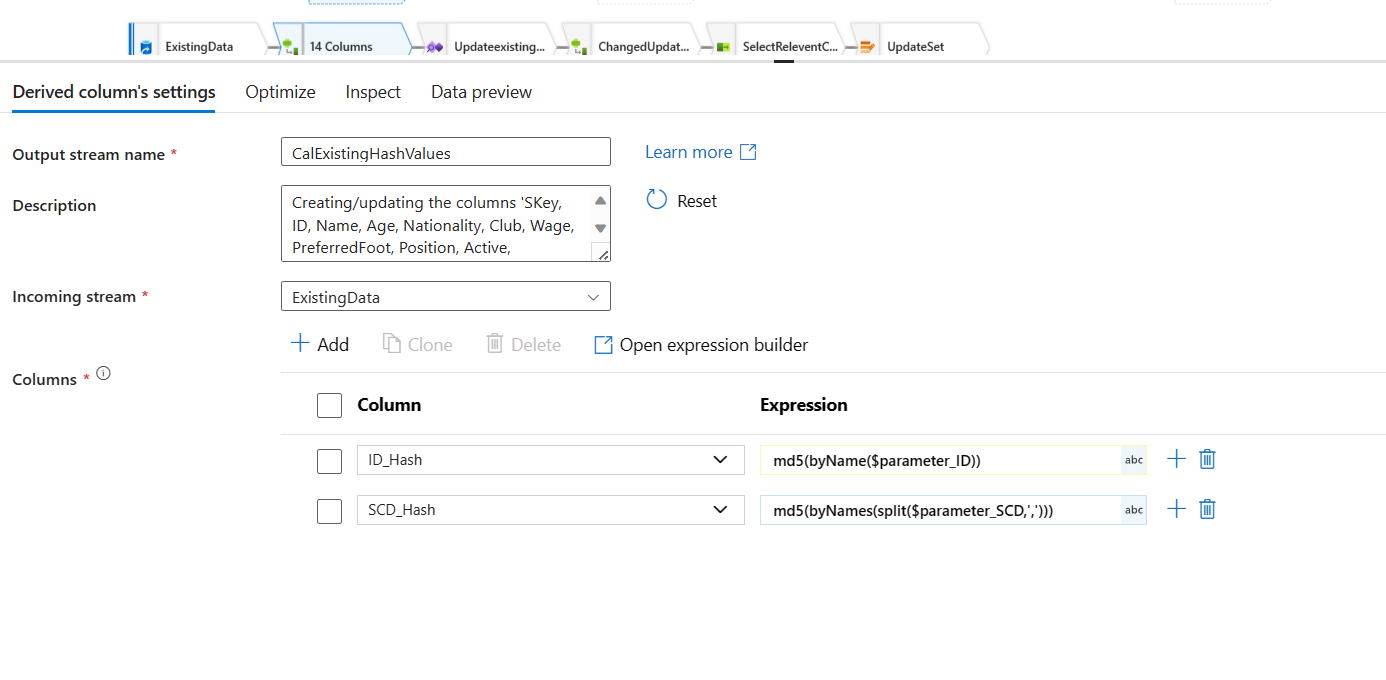
Md5 Hashing Values: Comparing MD5 hashes is computationally much faster than comparing entire rows of data, especially when dealing with large datasets. This speeds up change detection and makes the SCD type 2 process more efficient. Add a Derived Column steps for both the streams of sources you added to your dataflow. Configure the new Hash Value columns. Used the Parameters from the Dataflow. You already created the parameters in the previous instruction of this section (1).
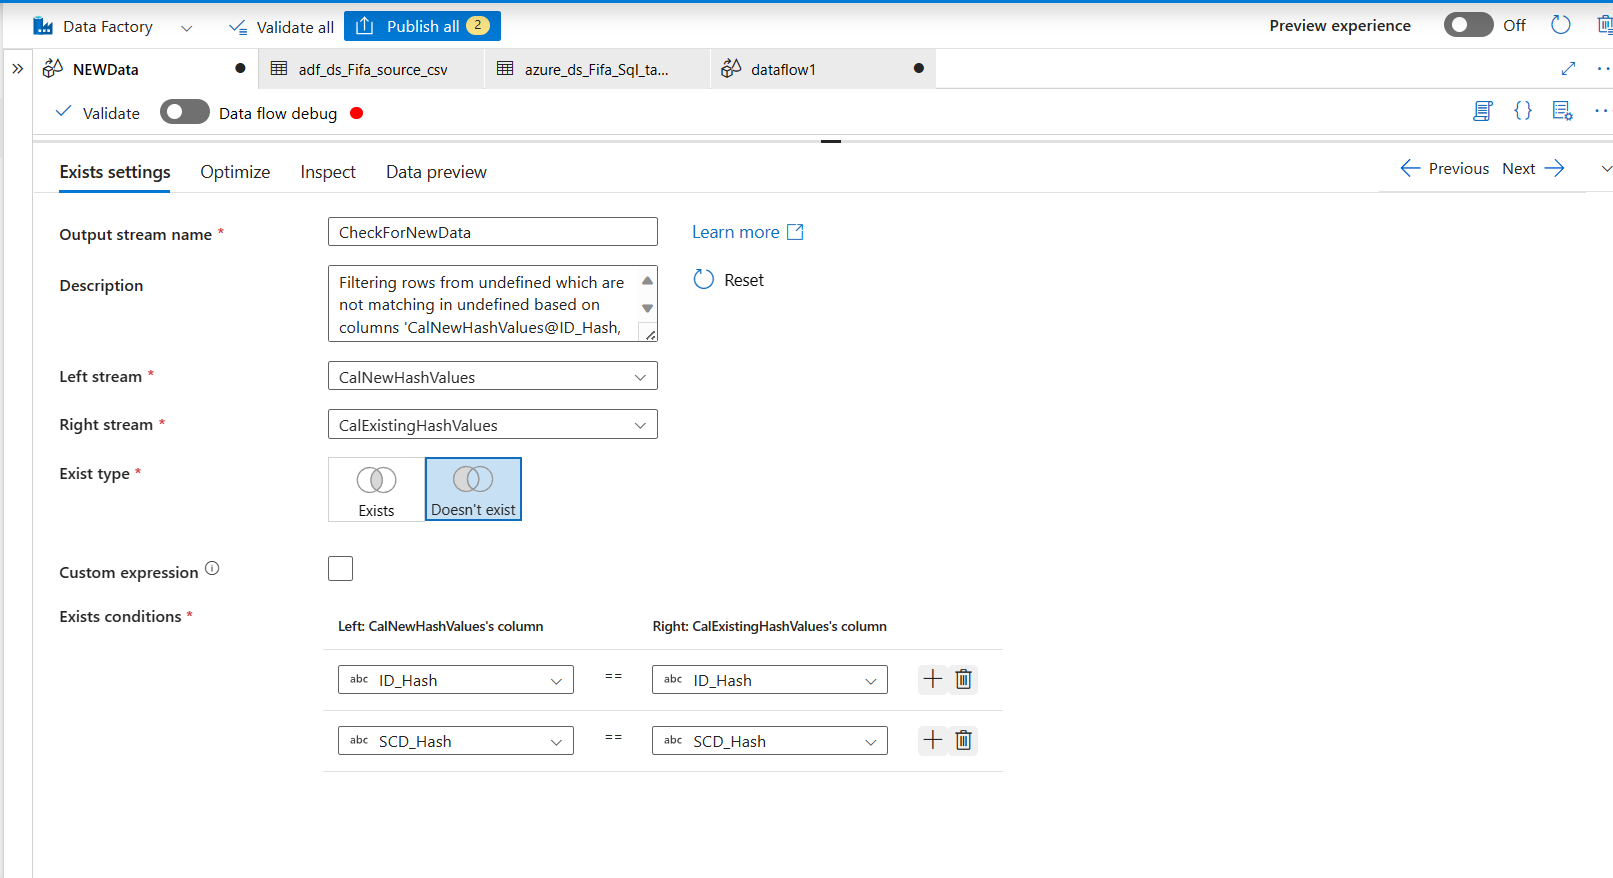
Comparing two streams of sources: Now you want to check for new data by comparing source data and data that already exists in the database. You want to add an exists step to the sources stream in dataflow and see take the data that does not exists in the source database. What is the condition for checking this? Comparing Hash Value Columns we created in the last stage. If the Hash Value columns matches, then the data exists. We do not want them in this stream. We want that does not exists. So we selected, Does not Exists option like the picture below.
Skey or Surrogate Key Concepts Implementation:
Imagine you have a big box of Lego pieces and you want to keep track of which pieces belong to which sets. Each piece has its own color and shape, like its natural key, but those might change or be the same for different pieces. This makes it tricky to know for sure which set each piece belongs to.Here's where a surrogate key comes in! It's like a special sticker you put on each piece that stays unique no matter what. Even if a piece changes color or gets broken, its sticker stays the same. This makes it really easy to find the right set for any piece.
In Slowly Changing Dimensions (SCD), which are like big Lego boxes of information, surrogate keys work in a similar way. They are unique, unchanging numbers assigned to each record in a dimension table, even if other details about the record (like names or addresses) change. This helps keep track of how things change over time without getting confused.
Here are some cool things about surrogate keys in SCD:
Super consistent: They never change, making it easy to track updates.
Super unique: No two records have the same key, so you can always find the right one.
Super efficient: They're small numbers, so searching and linking data is faster.
So, even though natural keys (like piece colors) can be helpful, surrogate keys are like those special stickers that always keep your Lego information organized and clear, even when things change.
Now you see our database Skey. When the new data is added. We want to assign an Skey to the new data in the new data stream we have here in our dataflow. But, the new Skey will be a continuation from the previous Skey from the database. If the last Skey from the database was 5, then new data Skey would be 5+1=6. So, logically, we are taking the maximum Skey from the existing database and adding to that in the new source Skey.
For accomplishing this, we add a Step called "Aggregate" to existing database stream of our dataflow. We are virtually creating a new column here in the flow with MaxSkey, that stores the max of the Skey.

Expression used:

Now, lets go back to our new data stream of the sources. Add a Surrogate Key step.
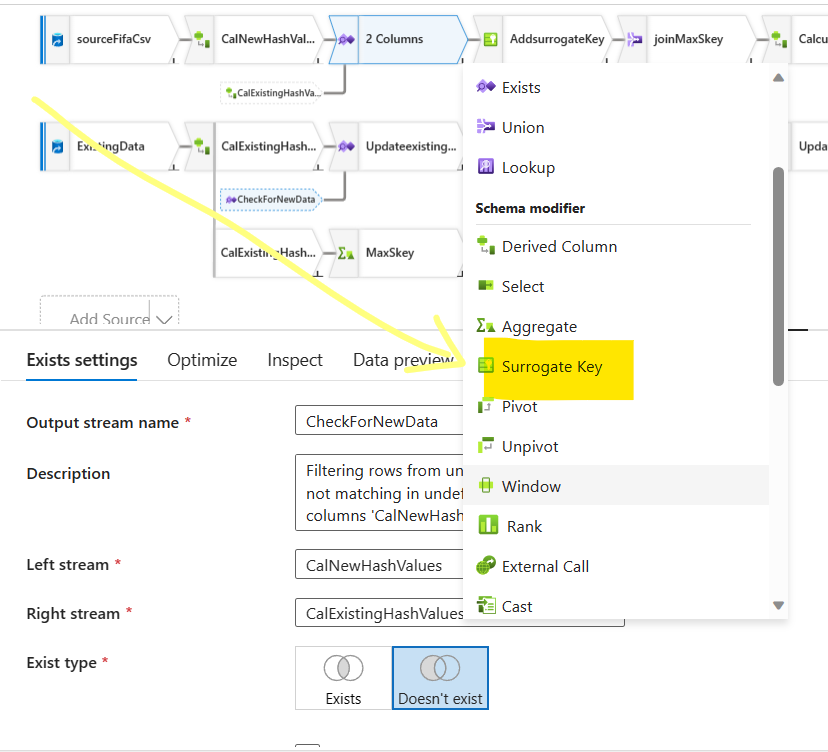
Update the Surrogate Key step: We keep the surrogate column name same. Do not think about anything else, just do as it is in the picture. I will explain the WHYs soon.
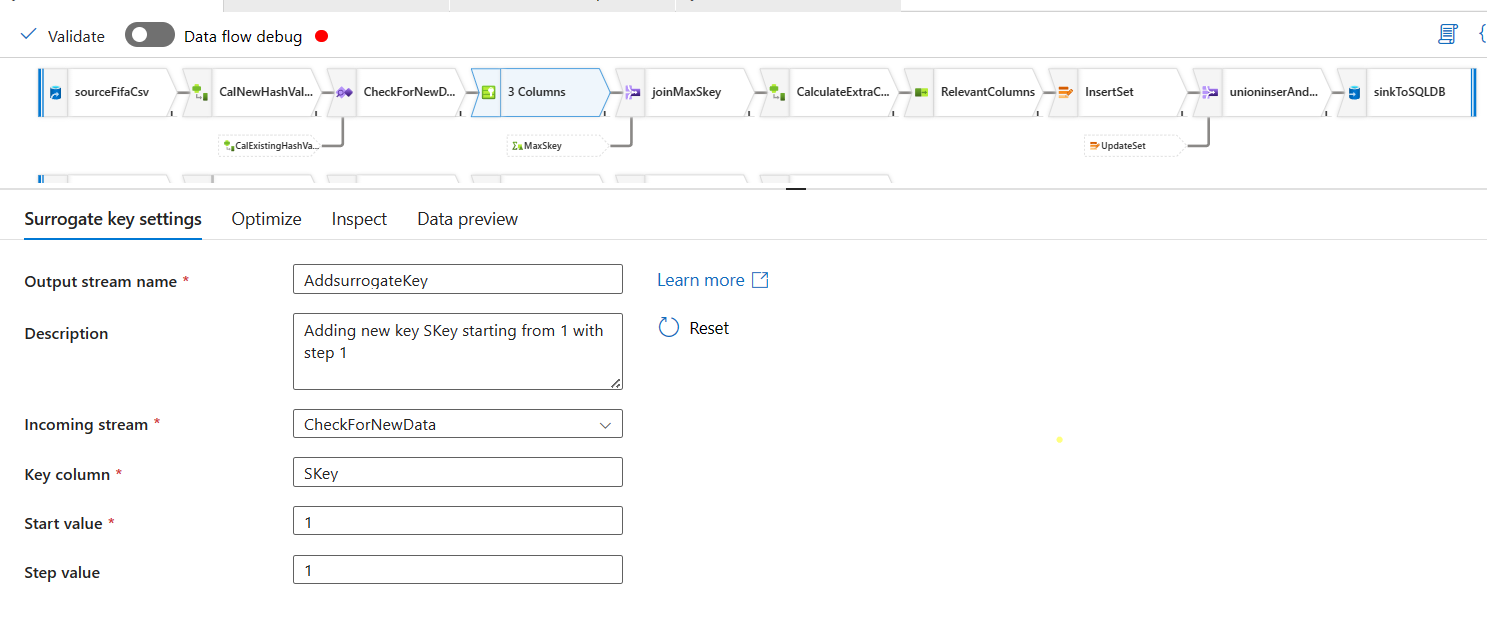
Now, these new records in the new source also has a Skey. This also starts with 1 and goes up like this. But, to make it continuous with the Skey from the database Skey, we will add this Skey with the Last Value from the existing database Skey. (i.e. MaxSkey). If the last value's Skey in the database is 5, then all the values for the MaxSkey in the existing stream of the datablow would be 5. Then when we want to update the Skey in the new sources stream, we can update the current Skey column of the new sources stream to add the MaxSkey. So, if the New Sources Stream Skey Skey value for the first new record is 1, then our new updated Skey would be 1+5=6.
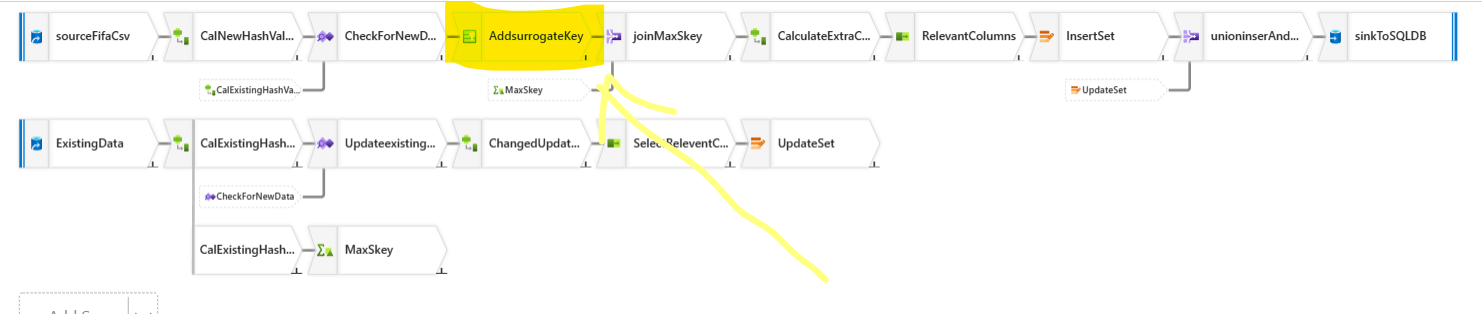
Bringing in the MaxSkey from the existing database stream: Now, we will bring the MaxSkey from the Existing Database Source stream to new data source stream with a step called Join.

However, in this join step, we will used a CrossJoin logic, because we are not joining based on any existing column, we are simply copying the data in.
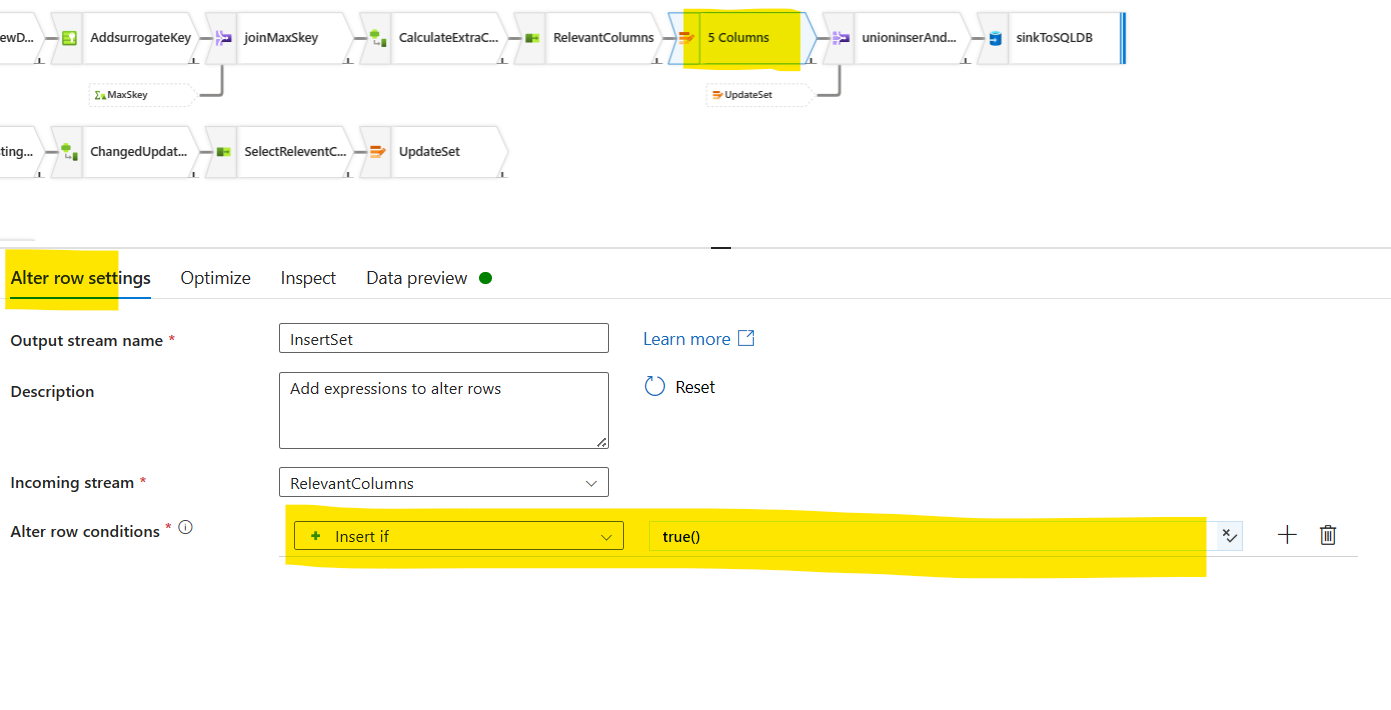
But, million dollar question is, how do we stop cross join from multiplying the records? We all know that a CrossJoin would multiply the records. But, we do not want that, so we set a join logic, which stops it from creating cartessian products of the records.The following expression you provided checks if
MaxSkeyis equal toSKey. If this condition is true, the row is included; if false, thetrue()part ensures that the row is included regardless of the comparison result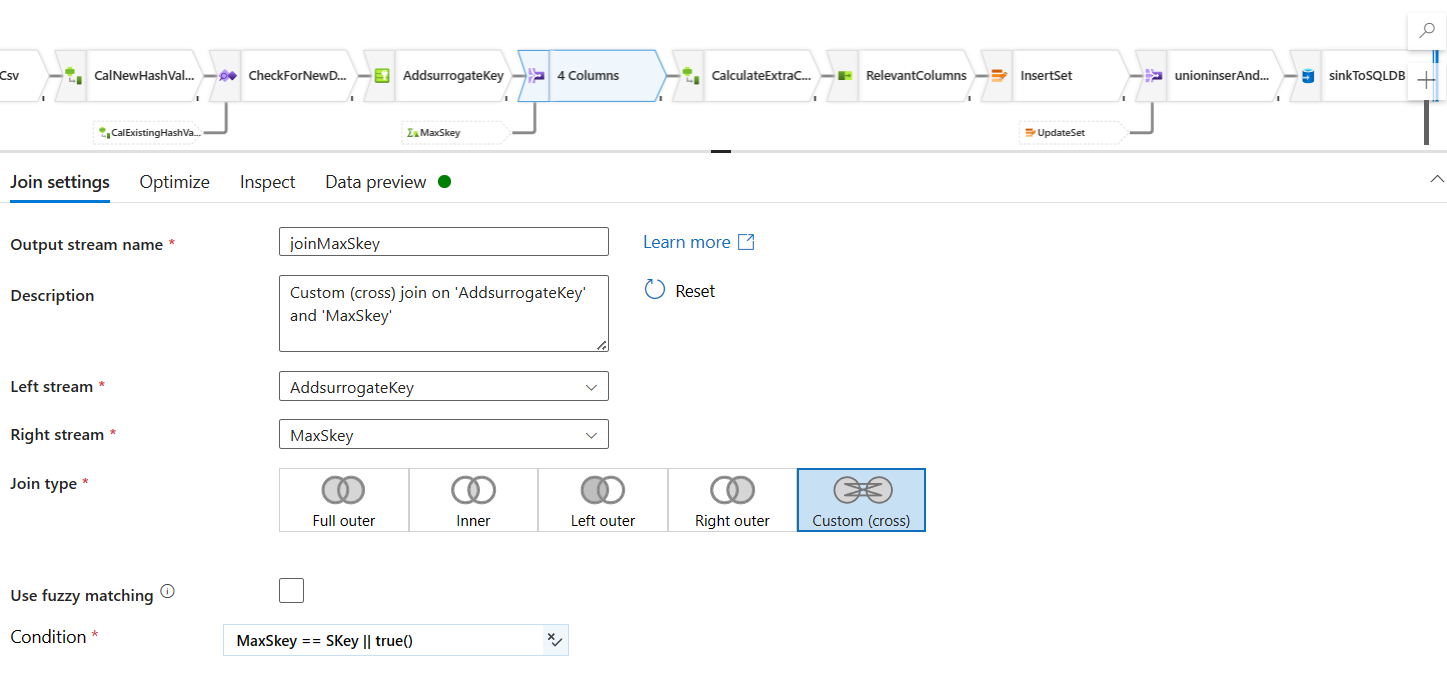
Adding extra columns to the new data sources stream:
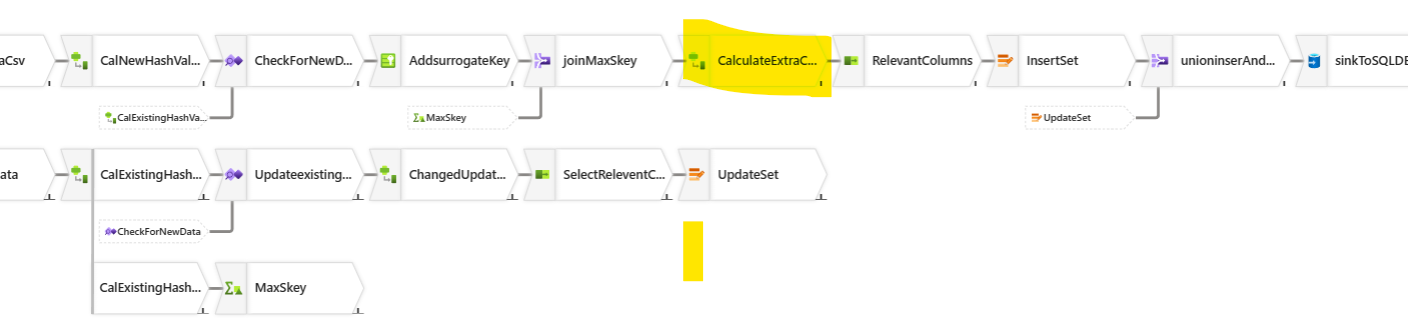
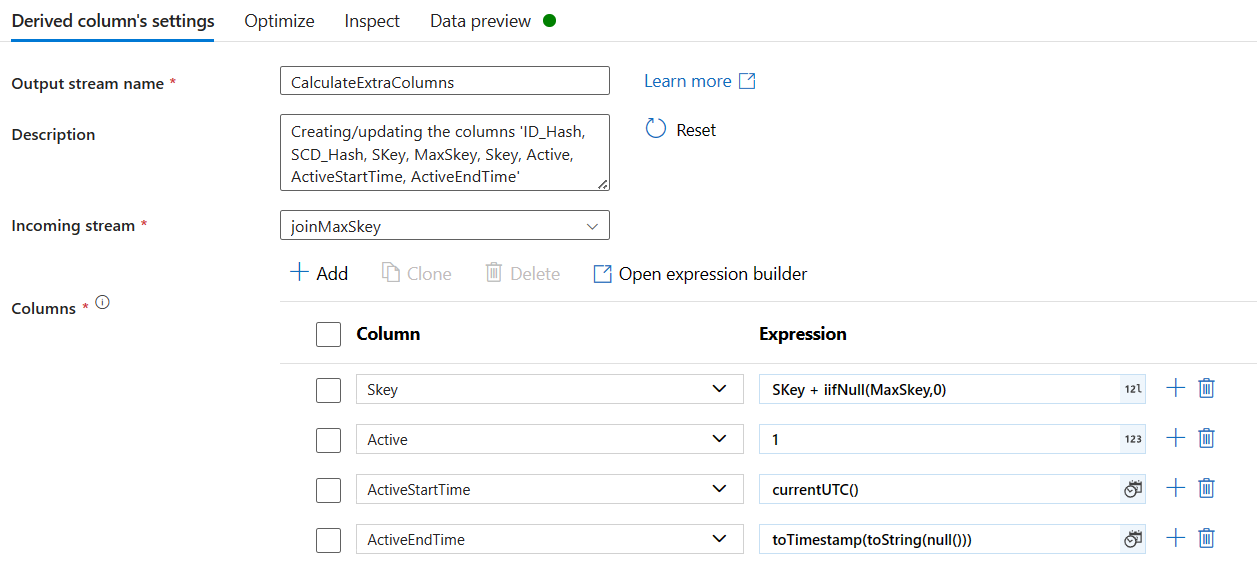
Do you see how we are adding extra columns? Look at the ActiveEndTime column. This is our expression:
toTimestamp(toString(null()))This is because, we are now adding new data, so, these new records are still active. When this records turn into inactive, we will provide values to this column. Till then, we will keep the column null and CAST the column into TimeStamp data type.Keep the relevant column only from the New data sources Stream: We will add a new step called Select and we will use this expression to unselect some column names.
nameshere indicate column names. Unselect the automapping and click on the rulebased mapping.
Here is the expression that must be used:
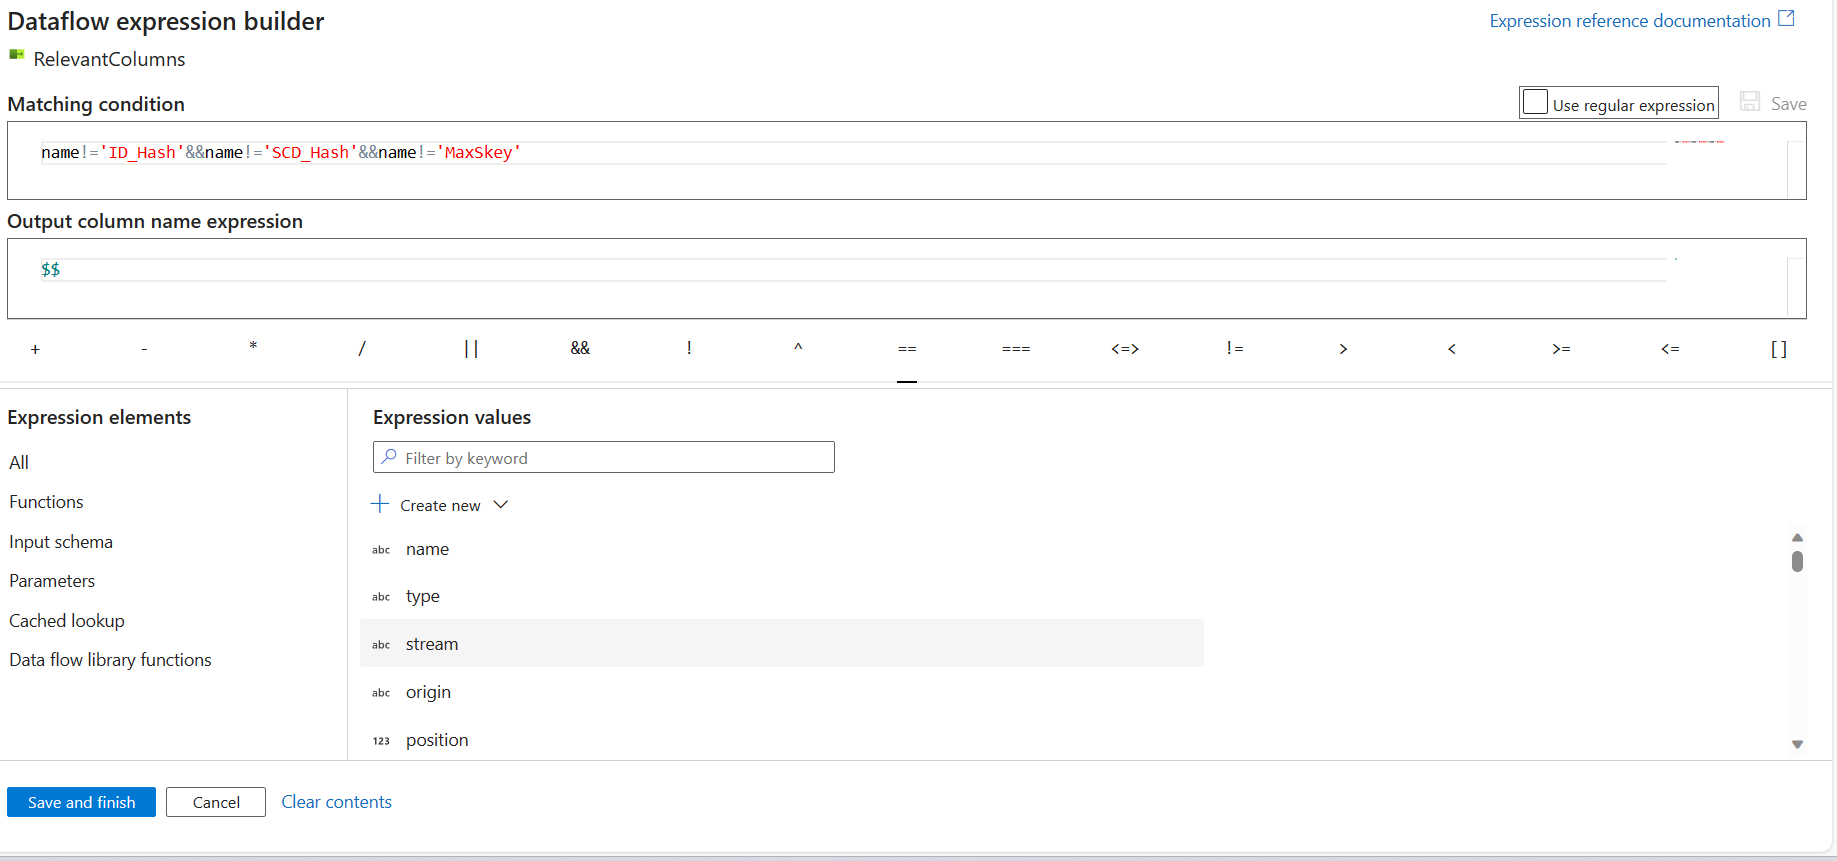
name!='ID_Hash'&&name!='SCD_Hash'&&name!='MaxSkey'------> output mapping:$$What this is doing is, keeping all the except the mentioned column names and $$ this, it is trying to say, that all we have. Map these now.
Inset the set step/ Alter Row Step: Now you create an alter row step. What this does is, it says, "hey our new data is good to be inserted. Store it in this step for inserting".
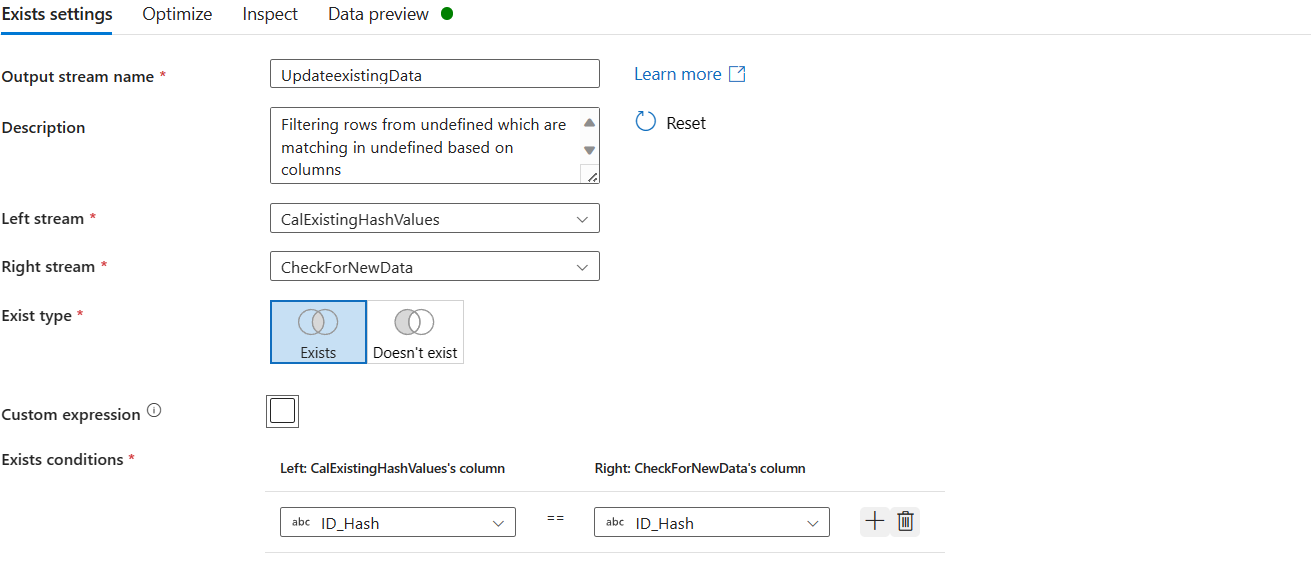
Dealing with updating existing data: We have to start with creating a new branch.

Exists Step is then added to find out data that is present in both, the new data source and existing dataset. Now the condition is Exists and compared based on the Hash ID values only. Because these data already exists in the system. Just new update is provided. If Hash IDs match, then we know these exists in our database however, their other details have changed. We need to now update the other details.
Add a derived column step to add ActiveEndTime: We are doing it to the new branch of the existing columns.
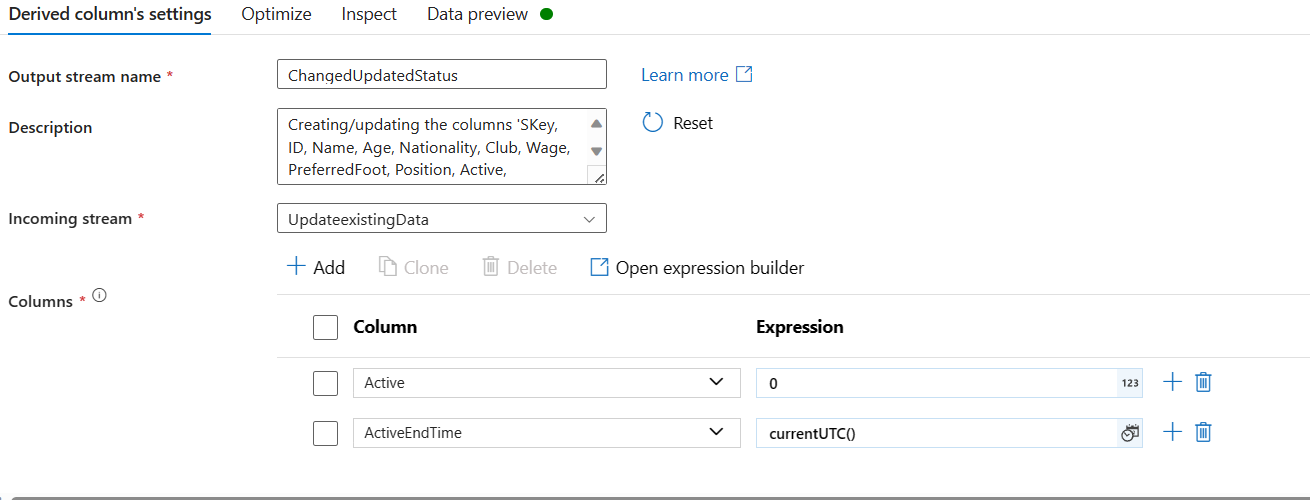
Select the relevant columns: Similar to what we did in the new data source stream but this time, we used a different expression.
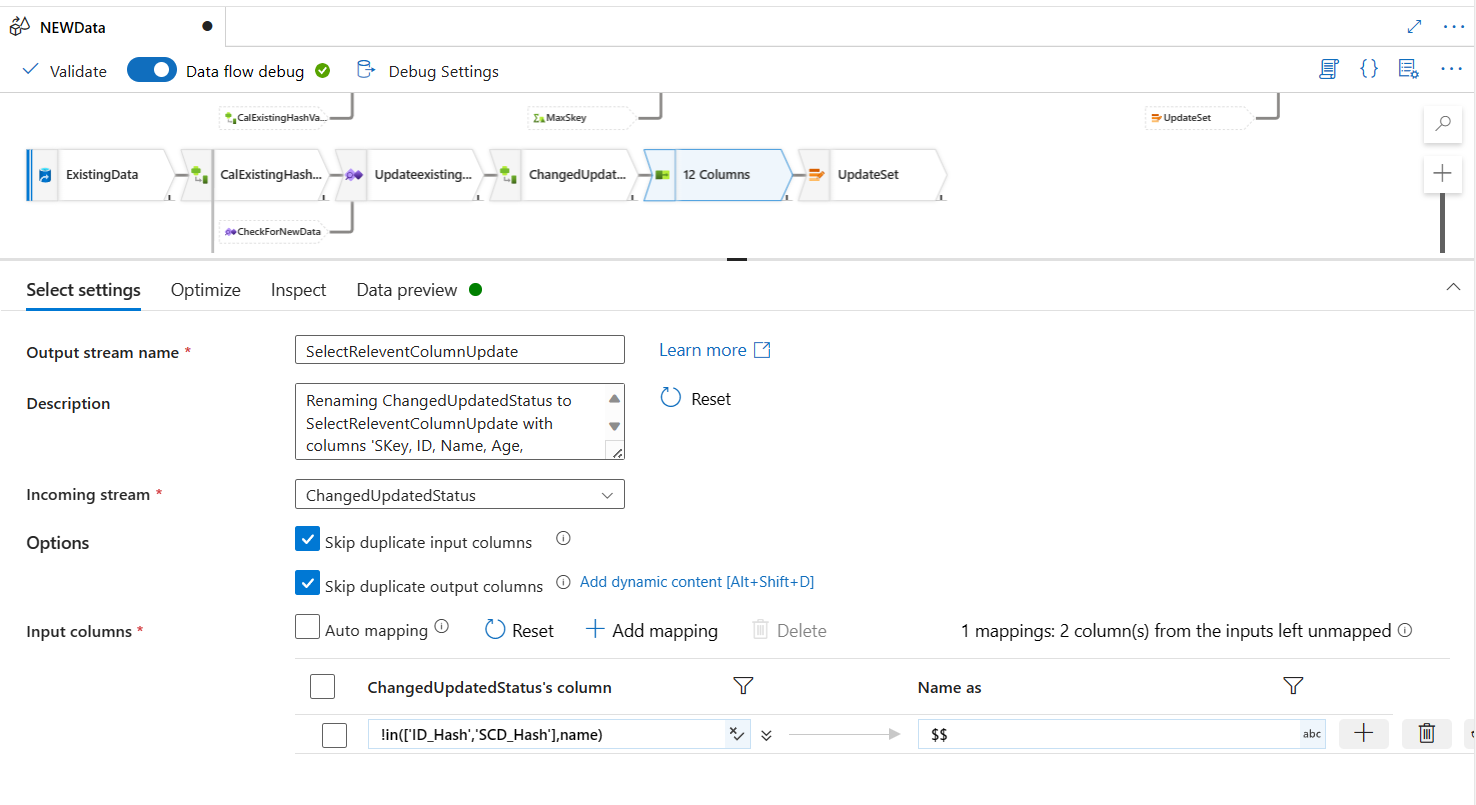
!in(['ID_Hash','SCD_Hash'],name)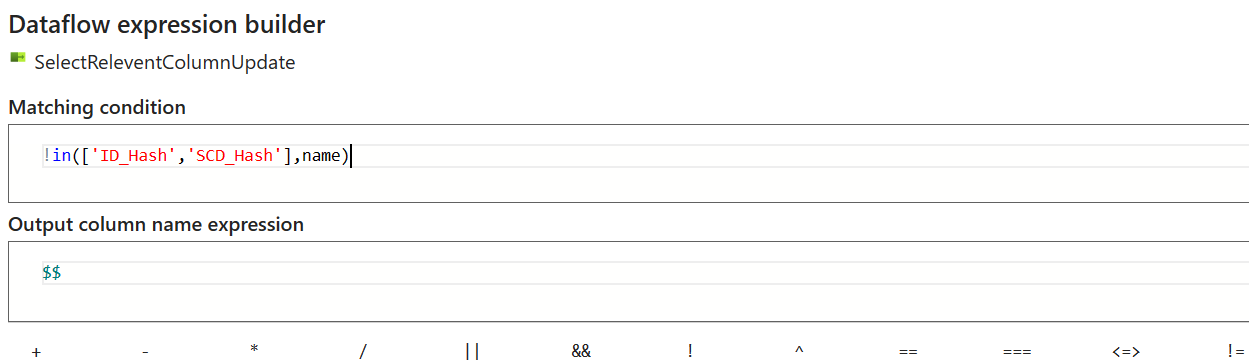
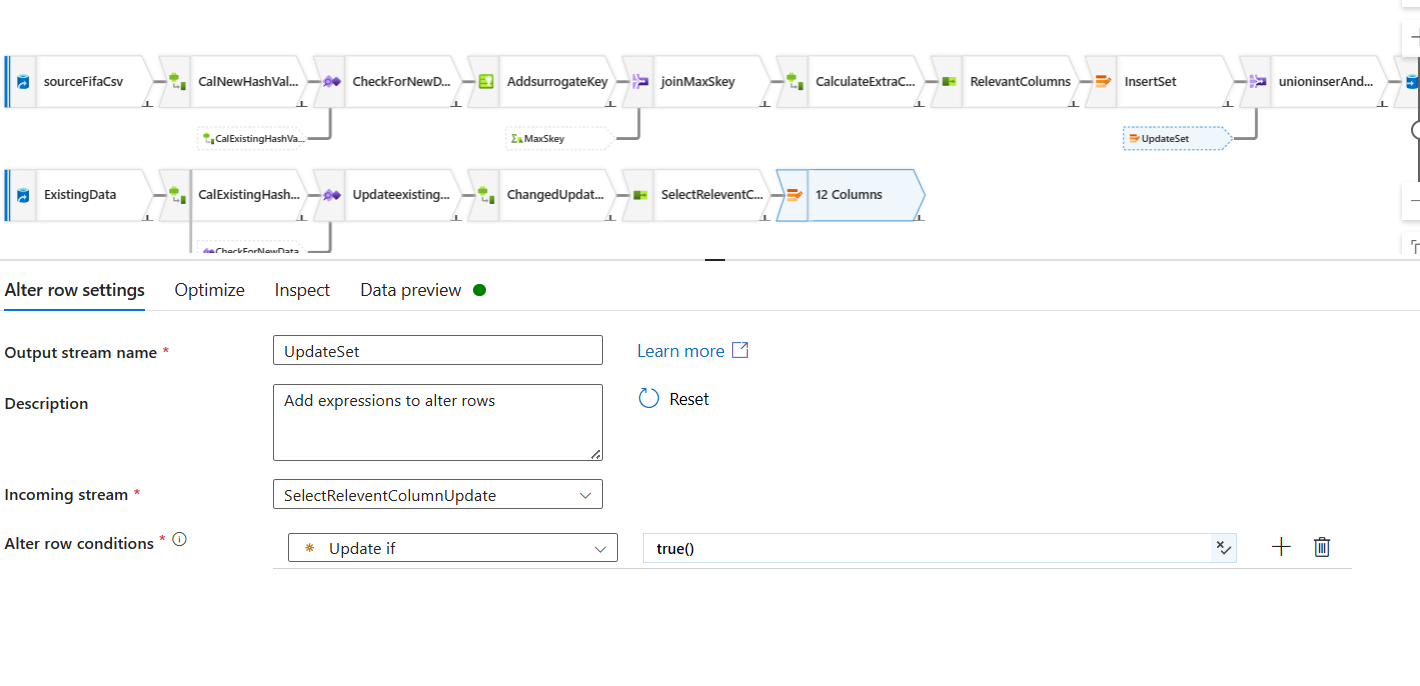
Adding an update Alter Row step: Similar to the Insert Alter Row step we did previously, now we will do an update Alter Row step if true.
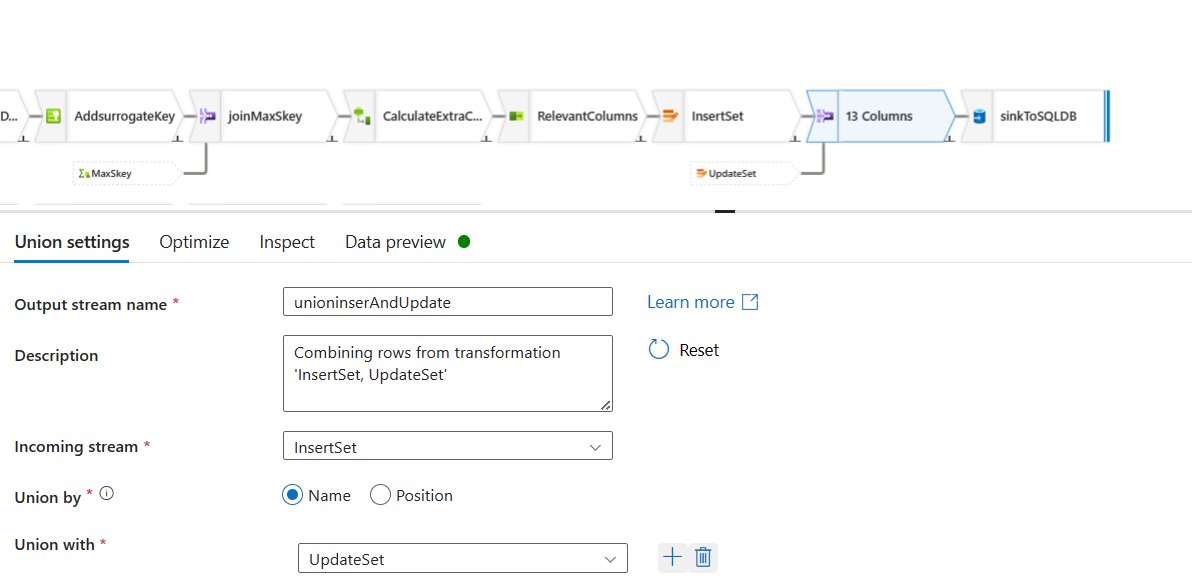
Union the data for insert and data for update: We told you that our data is waiting for in an alter row step for insert and update. This time, we will go back to our New Data Source stream of the dataflow. We will add a new step after the Alter Row insert step called union. This time we will bring in the updated Alter Row data and union two datasets like SQL union all.
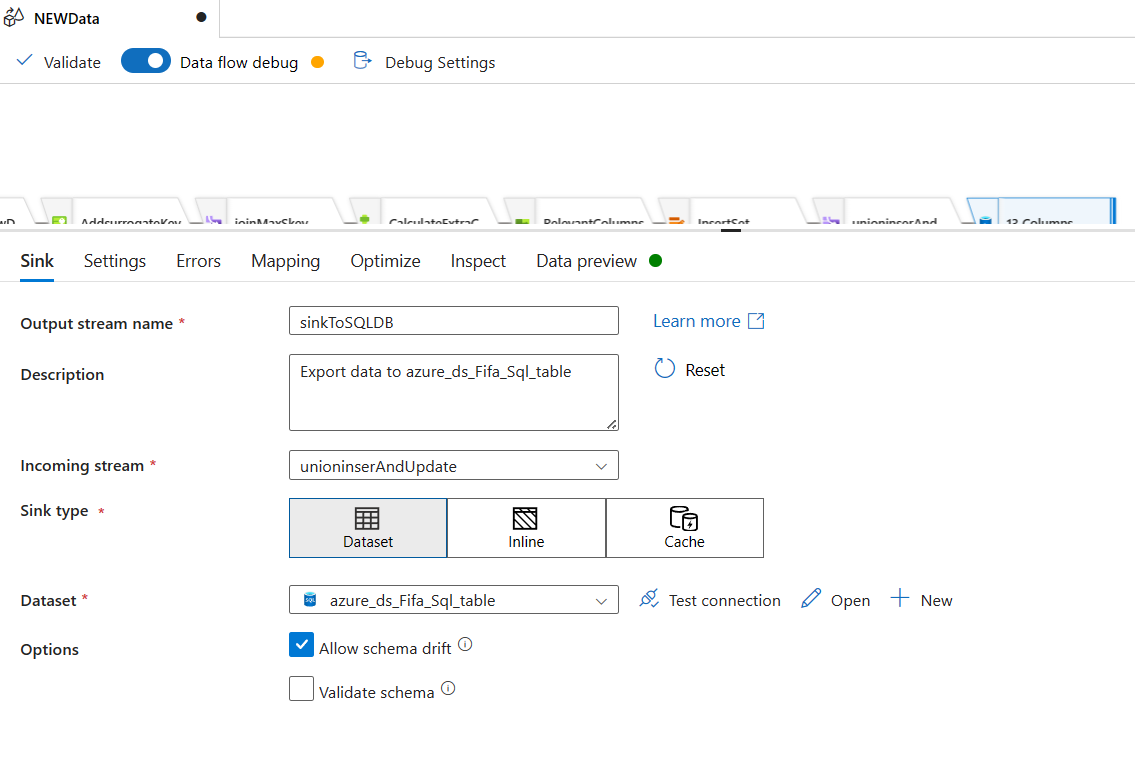
Sink: We will use the Sink step to push the data into the dataset of sql database. This dataset already exists.
Alright. Our data flow is ready. But, our Pipeline is not ready. We will create a pipeline now.
Creating Pipeline
We create a Pipeline with two Get Metadata activity. Objective is to Structure information of the tables from the debug result. We debug the results once. Copy the Structure data. These will be helpful when creating Validating SQL Table.
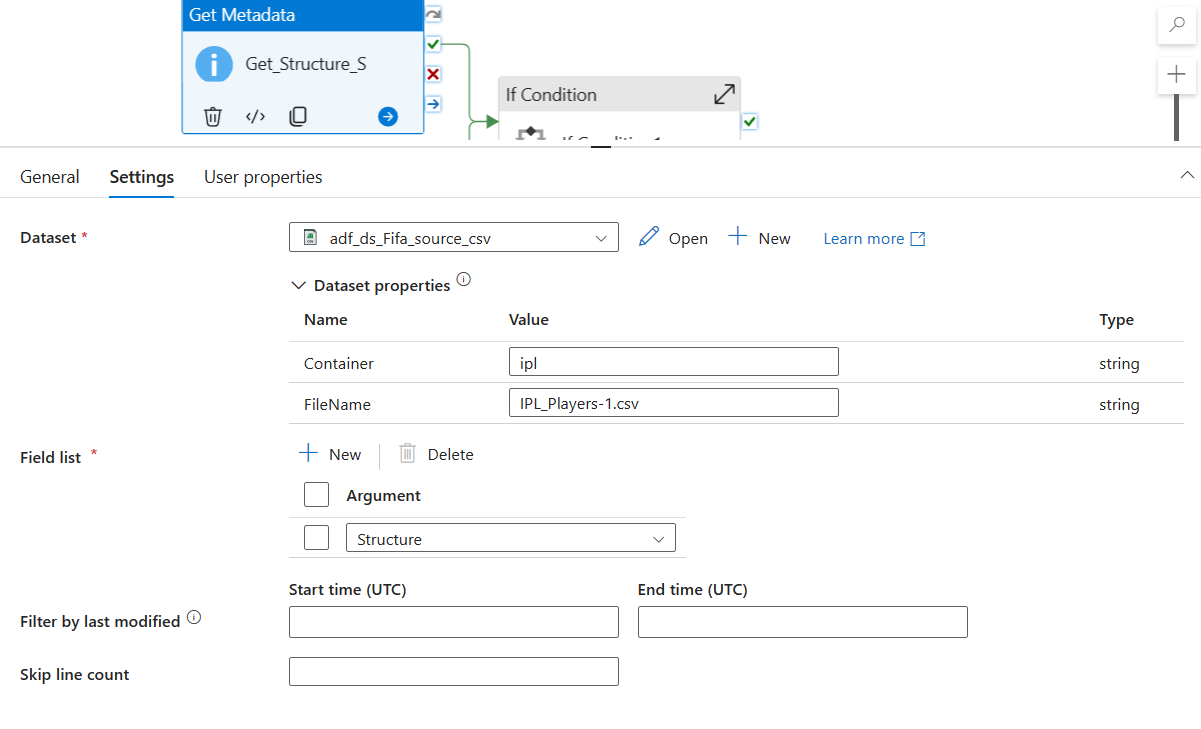
This image shows the process for Source. We need to create another one for the Database table where we want to insert our data.
Now we will create the following table that contains meta data for validation.

You see the Structure column here? This is what we got from the last stage and other columns are hard coded.
We create a stored procedure, which returns the data from this table. Following was the code used:
 SET ANSI_NULLS ON
 GO

 SET QUOTED_IDENTIFIER ON
 GO

 CREATE PROCEDURE [dbo].[uspGetFileDetails]
     @FileType [nvarchar](60)
 AS
 BEGIN
     SET NOCOUNT ON;

 select
     ContainerName,
     [NFileName],
     SchemaName,
     TableName,
     Structure,
     [P_ID],
     [P_SCD]

 from [dbo].[tbl_FileDetails]
 where  [FileType] = @FileType and [Active] = 1;

 END
 GO
When the stored procedure is called, it returns only one row with the FileType mentioned. Now we will go back to ADF and we will see, how we can call this Stored Procedure and use this data for making our pipeline more dynamic.
Now we go back to the pipeline we were working on. We deleted sql meta data activity. Now we will create a parameter.
After creating the parameter, we will create a lookup activity to execute the Stored Procedure.
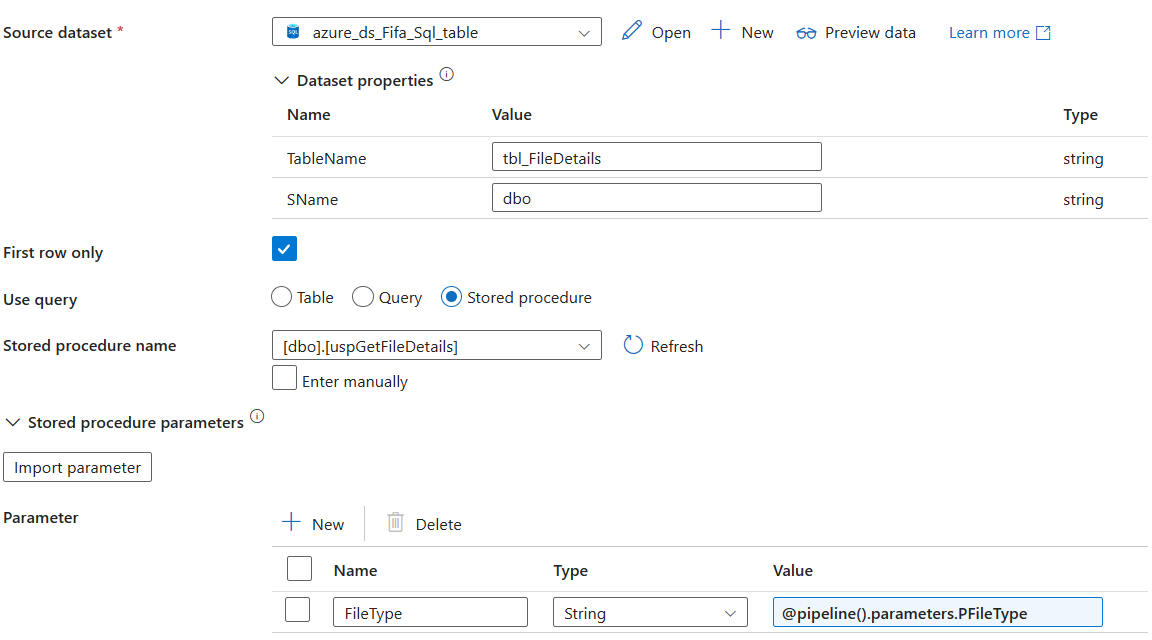
We have the first row selected. Because we only need the data of the first row. This will be a json output. I mean, the data from the Stored Procedure will be a json output.
Now, we will add another If condition to our pipeline. This If Condition activity will test if there is a match between the data from the Source Meta Data Activity's Structure and Lookup activity's result's first row's structure column.
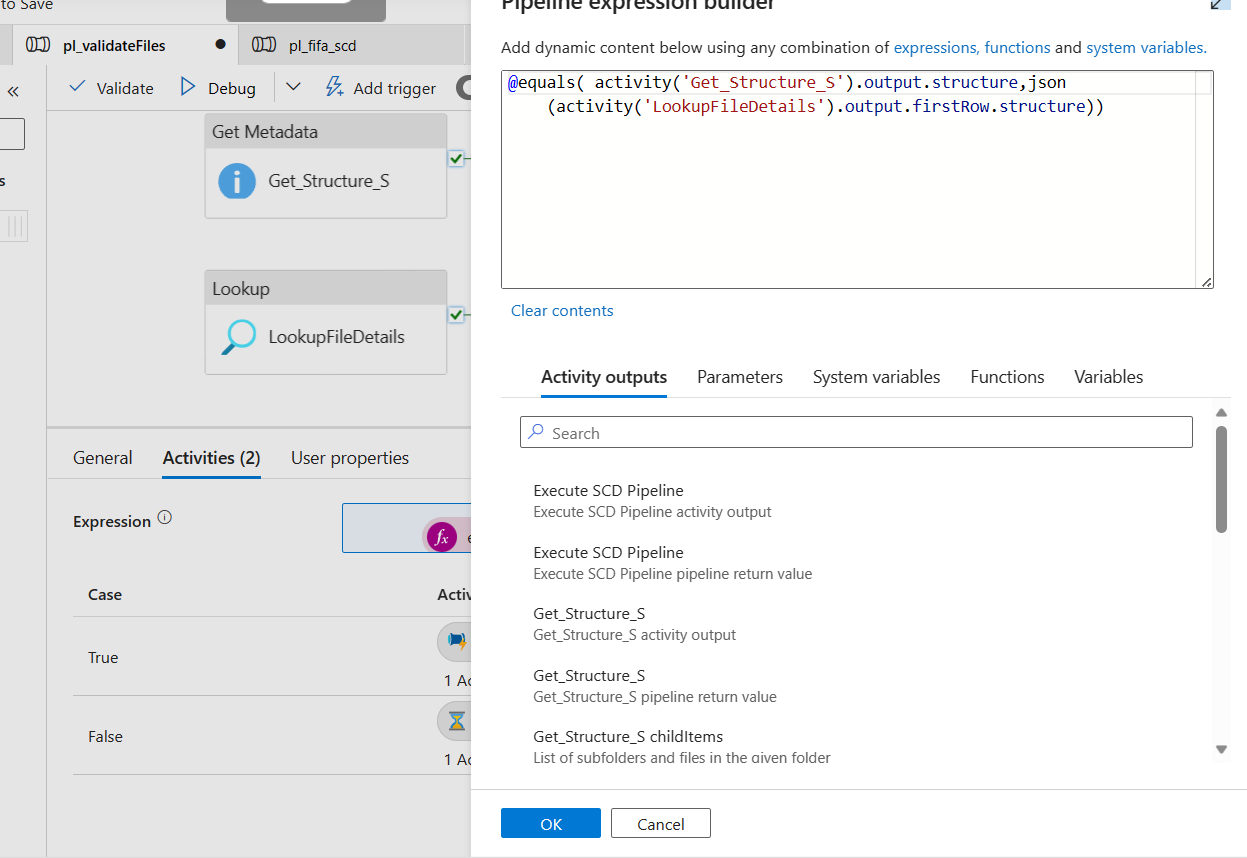
Yes, we had to use a json casting because our result from the lookup details output was not in json.
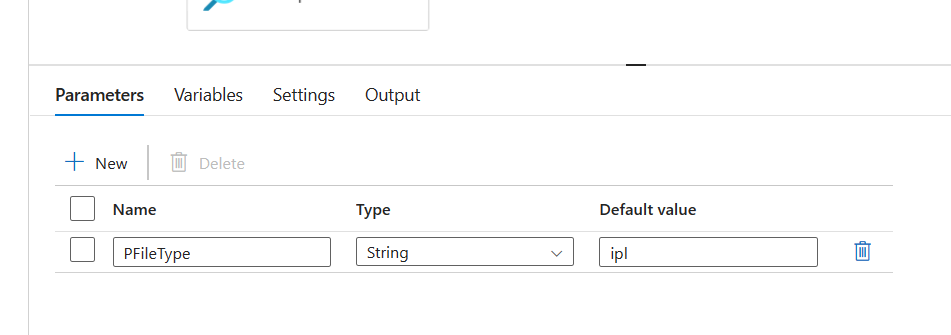
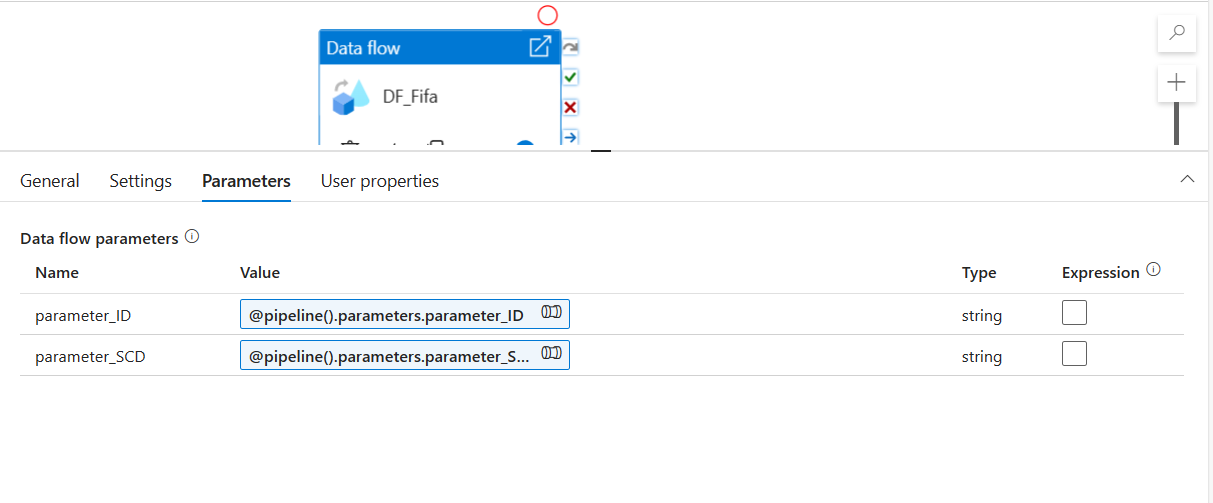
Now, let's go ahead and create a second pipeline. You have to create the following Parameter that will be used by the activities of this pipepline.
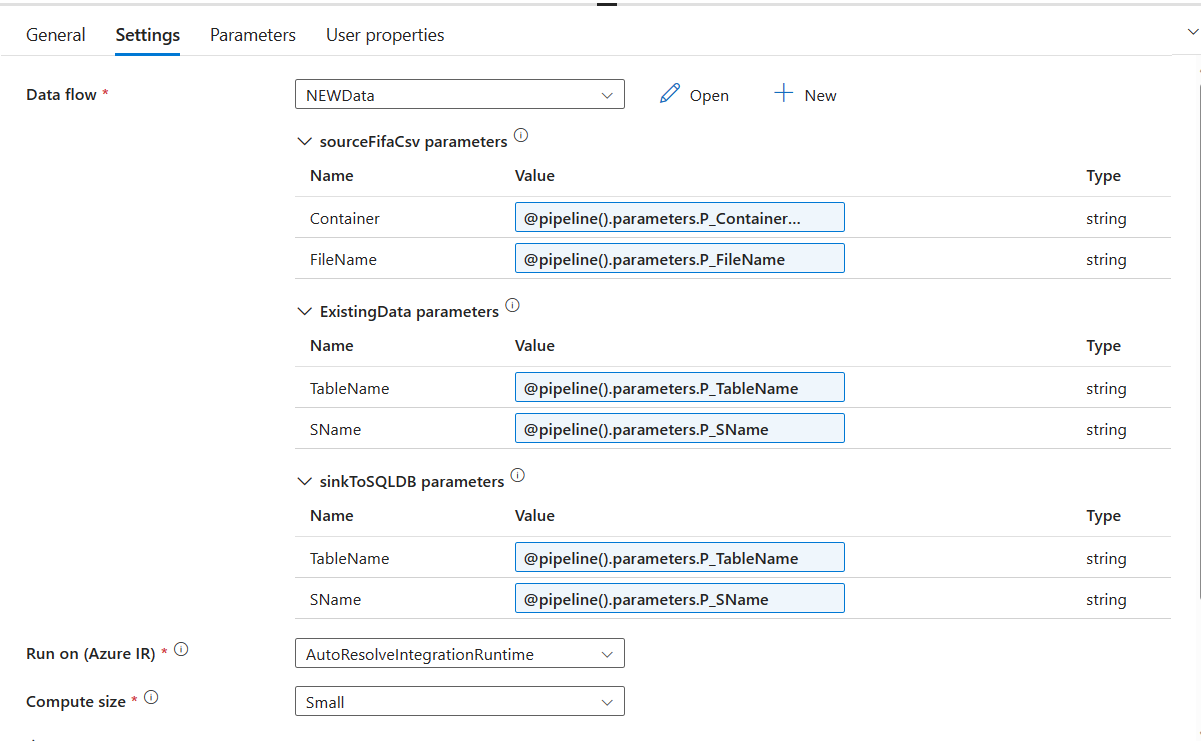
After you create the pipeline, you add a dataflow activity and populate the following parameters for your dataflow.
Now let's go back to our previous Pipeline with the If Condition. Now do to this page:
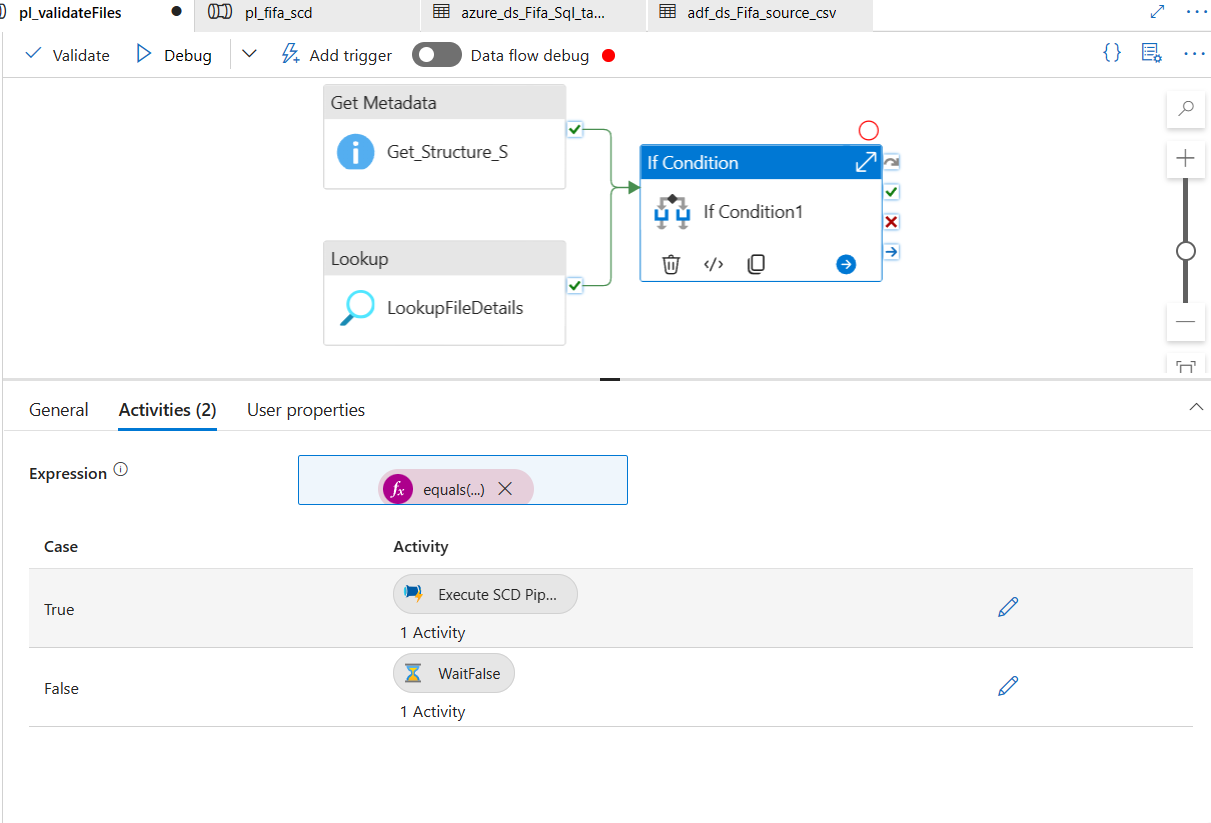
We will have to now set up an activity, that will be executed if the expression we defined in the step 6 is true.
In the True activities, we select an Execute Pipeline Activity and We select the Second Pipeline we created in this section to be executed if the expression of the If Condition turns out to be true.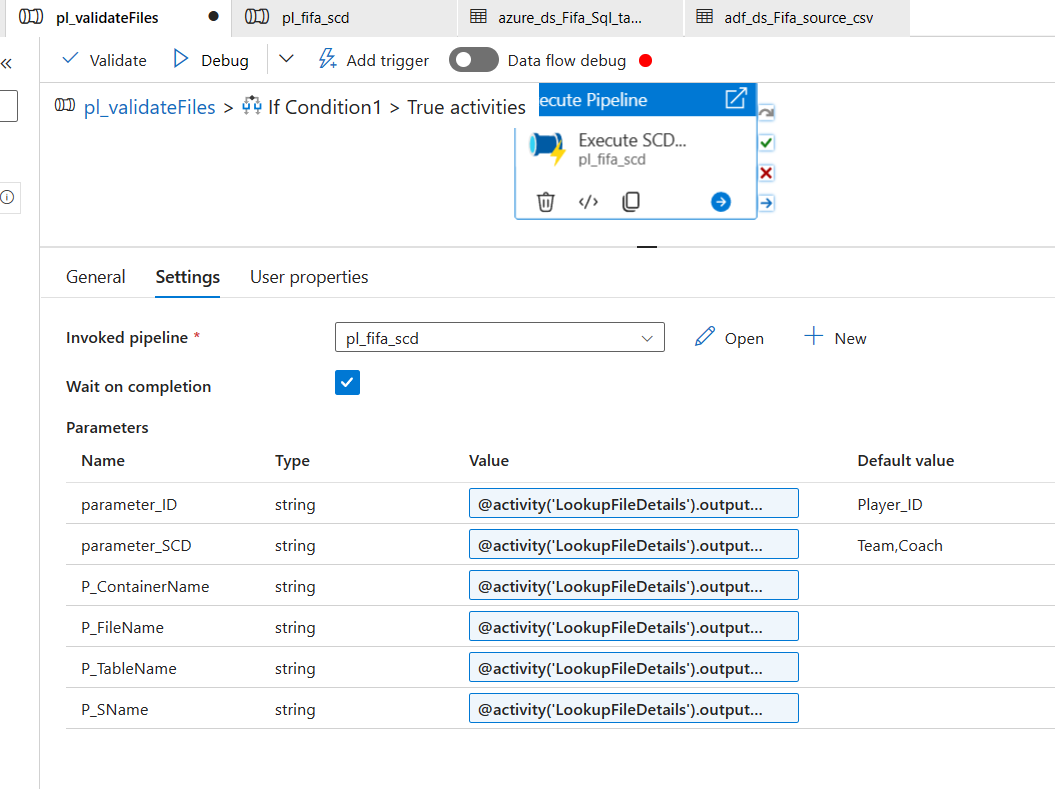
We also put the parameters values dynamically using expression builder. We take these expression values from the lookup activities output.
 @activity('LookupFileDetails').output.firstRow.P_ID
 @activity('LookupFileDetails').output.firstRow.P_SCD
 @activity('LookupFileDetails').output.firstRow.ContainerName
 @activity('LookupFileDetails').output.firstRow.NFileName
 @activity('LookupFileDetails').output.firstRow.TableName
 @activity('LookupFileDetails').output.firstRow.SchemaName
Above image shows what the expressions we used as values.
That's it. Your piepline is ready. You can download all the json scripts for this project from my github.
